
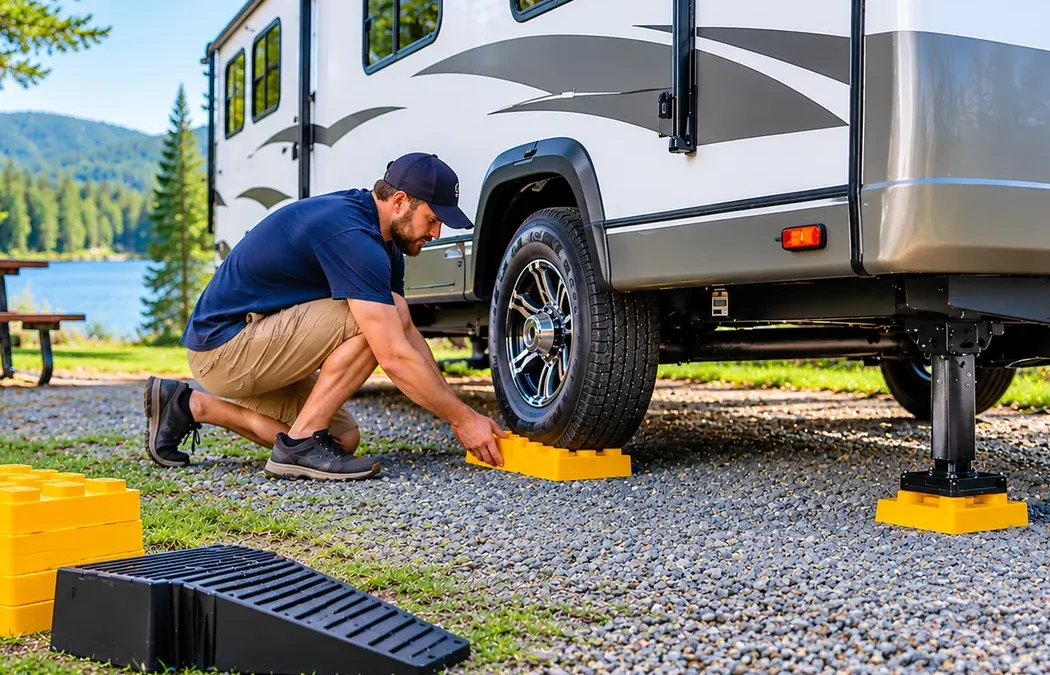
Parking an RV at a campsite does not always mean finding a perfectly flat surface. Gravel pads, sloped driveways, grassy areas, and uneven terrain can make setting up a recreational vehicle challenging. Learning how to level an RV on uneven ground helps you create a more comfortable and stable setup while reducing unnecessary stress on your vehicle’s components.
Proper RV leveling involves more than placing blocks under the tires. You need to understand how to measure the vehicle’s position, select suitable leveling equipment, secure the wheels, and make adjustments according to your RV’s design. Whether you own a travel trailer, fifth wheel, or motorhome, using the correct method can make campsite setup easier and help prevent equipment damage.
This guide explains the tools you need, how to level different types of RVs, the mistakes to avoid, and what to check before settling into your campsite.
Why Is Proper RV Leveling Important?
An RV that sits unevenly can create problems with comfort, equipment operation, and everyday activities. Even a noticeable slope can affect how doors, cabinets, appliances, and other interior components function.
Here are some reasons why proper leveling matters.
Improves Comfort Inside the RV
When an RV is tilted, floors, beds, and furniture may feel uneven. Small everyday activities, such as cooking, sleeping, showering, and walking through the vehicle, can become uncomfortable.
Proper leveling helps create a more balanced interior environment. It also makes it easier to use furniture, cabinets, and other equipment as intended.
Helps Certain RV Appliances Operate Correctly
Some RV appliances have specific leveling requirements. For example, certain absorption refrigerators that operate using propane require the RV to remain within the manufacturer’s permitted level range.
Operating these appliances outside their recommended limits can affect performance and, depending on the appliance, may cause damage.
Check the refrigerator and appliance manuals to understand their individual requirements. Not every RV refrigerator has the same leveling restrictions.
Supports Proper Slide-Out Operation
Slide-outs increase the available living space inside many recreational vehicles. However, they depend on the RV being positioned according to the slide-out manufacturer’s operating requirements.
An uneven setup may affect alignment, sealing, and movement. Some manufacturers require the RV to be leveled before extending slide-outs, while others specify a particular setup sequence.
Always follow the instructions for your specific RV rather than assuming every model operates the same way.
Helps Maintain a Stable Campsite Setup
Leveling and stabilization work together, but they are not the same process. Leveling positions the RV evenly from side to side and front to back. Stabilization helps reduce movement after the vehicle has been leveled.
Understanding this difference is important because using the wrong equipment can damage jacks, frames, or other components.
Essential Tools You Need to Level an RV
Having the right equipment makes it easier to manage different campsite surfaces. Before purchasing RV leveling accessories, check your vehicle’s weight, tire configuration, jack specifications, and manufacturer’s recommendations.
The following tools are commonly used for manual RV leveling.
1. RV Leveling Blocks
RV leveling blocks are designed to raise one side of a vehicle when it is parked on uneven ground. They are available in different shapes, sizes, and materials.
Common options include:
- Interlocking plastic leveling blocks.
- Stacking blocks designed for RV tires.
- Heavy-duty leveling platforms.
- Specialized blocks designed for particular axle configurations.
Choose blocks with an appropriate load rating for your RV. They should sit securely on the ground and be positioned according to their manufacturer’s instructions.
Avoid using loose bricks, unstable objects, or damaged blocks as substitutes for proper leveling equipment.
2. RV Leveling Ramps
Leveling ramps provide a gradual surface for raising one side of an RV. They are particularly useful for owners who prefer driving onto a ramp instead of stacking several individual blocks.
Some ramps have graduated heights, allowing you to make small adjustments until the desired level is reached.
Before using a ramp, check its weight capacity and compatibility with your tire size. Position it securely and follow the manufacturer’s instructions for driving onto it.
3. Wheel Chocks
Wheel chocks help prevent an RV from rolling while it is parked or being adjusted. They are especially important when working on sloped surfaces or disconnecting a tow vehicle.
Consider keeping suitable chocks in your RV equipment kit. Their size and placement should match your wheel configuration and the manufacturer’s safety recommendations.
Remember that chocks are not a replacement for leveling blocks or approved leveling systems. They serve a different safety purpose.
4. Bubble Level or Digital Level
A bubble level or digital leveling device helps you determine whether your RV is positioned correctly.
You need to check two directions:
- Side to side: Identifies whether one side of the RV sits lower than the other.
- Front to back: Identifies whether the front or rear needs adjustment.
Some RV owners install permanent bubble levels in convenient locations. Others use a portable digital level during campsite setup.
Use a consistent measurement location so that your readings remain reliable.
5. Jack Pads and Leveling Pads
Jack pads help distribute pressure over a wider surface when an RV’s leveling equipment is placed on soil, gravel, or another surface that may not provide sufficient support.
They can reduce the likelihood of a jack sinking into soft ground. However, they must be suitable for the weight and equipment involved.
Do not assume that adding a small pad makes an unstable campsite safe. If the ground cannot support your RV, choose another parking location.
6. RV Leveling Jacks and Automatic Systems
Some recreational vehicles have built-in leveling equipment. Depending on the model, this may include:
- Manual leveling jacks.
- Electric leveling systems.
- Hydraulic leveling systems.
- Automatic leveling controls.
- Tongue jacks or fifth-wheel landing gear.
Read the manufacturer’s instructions before operating these systems.
For more equipment information, Lippert’s RV leveling and stabilizer guide explains the different purposes of leveling and stabilization equipment.
What to Check Before Leveling an RV on Uneven Ground
Before using leveling blocks or operating jacks, inspect the campsite and understand the limitations of your RV’s equipment. A suitable parking location makes the entire process easier and reduces the amount of adjustment required.
Choose the Most Stable Available Parking Area
Look for the flattest available area with firm, reasonably level ground. A slight slope may be manageable with the right equipment, but steep or unstable terrain can make leveling difficult or unsafe.
Check for:
- Deep tire depressions or uneven patches.
- Loose gravel that may shift under the vehicle.
- Soft soil that may not support leveling jacks.
- Standing water or areas that become muddy.
- Rocks, branches, and other objects beneath the tires.
- Enough clearance for slide-outs, awnings, and leveling equipment.
Avoid parking where the RV could shift or where the leveling equipment would need to extend beyond its recommended operating range.
When planning a stay at an RV resort, it also helps to check the property layout beforehand. You can review the Porter Strong RV Resort park map to understand the available site layout before arrival.
Inspect the Ground Where the Equipment Will Sit
The surface beneath your tires and leveling jacks needs to support the vehicle’s weight.
For example, a hydraulic leveling jack placed on soft ground may gradually sink, causing the RV to become uneven again. Suitable jack pads can distribute pressure over a wider area when approved for your equipment.
Check each intended contact point before making adjustments. If the surface is too soft, unstable, or uneven to provide reliable support, choose another location.
Understand Your RV’s Leveling Requirements
Different recreational vehicles have different leveling systems and weight distribution requirements.
Before starting, identify:
- Whether your RV uses manual or automatic leveling.
- Where the approved leveling and support points are located.
- How much adjustment the installed equipment allows.
- Whether the manufacturer requires the slide-outs to remain retracted during leveling.
- What type of blocks and pads are suitable for your vehicle.
Your owner’s manual should be the primary reference. Do not assume that a leveling procedure designed for one travel trailer will work for every fifth wheel or motorhome.
If you are new to campsite setup, our first-time RV travel tips guide also covers useful arrival preparations, including leveling blocks and wheel chocks.
Step-by-Step Guide to Leveling an RV on Uneven Ground
The exact procedure depends on your RV type and installed equipment. The following general process explains how manual leveling typically works for towable RVs and what motorhome owners should consider.
Step 1. Position the RV on the Safest Available Surface
Position the RV so that it has enough room for leveling equipment, stabilizers, slide-outs, and other components.
Try to minimize the slope before making adjustments. Choosing a better parking position can reduce the number of blocks required and prevent unnecessary extension of the jacks.
Before moving into position, consider:
- The direction of the slope.
- The space available for the towing vehicle.
- Clearance around the RV.
- The location of water, electrical, and sewer connections.
- The condition of the ground beneath each tire.
Move slowly and use a spotter when maneuvering onto a campsite with limited visibility.
Step 2. Measure Side-to-Side and Front-to-Back Level
Use a bubble level or digital leveling tool to determine how much adjustment is needed.
First, check the side-to-side position. This tells you whether the driver’s side or passenger side is lower.
Next, check the front-to-back position. This indicates whether the front or rear needs adjustment.
For consistent measurements, place the level on a stable surface recommended by the RV manufacturer. Record the readings before making adjustments.
Avoid estimating the slope just by looking at the RV. A vehicle can appear reasonably level from outside while still being noticeably tilted inside.
Step 3. Secure the RV Before Making Adjustments
Preventing unwanted movement is an important part of safe leveling.
Use the parking brake and wheel chocks according to your RV and equipment manufacturer’s instructions. Keep people and pets away from tires, ramps, jacks, and other moving components.
For a conventional travel trailer, side-to-side leveling may involve positioning the trailer on ramps or blocks while it remains connected to the tow vehicle. In that situation, follow the ramp manufacturer’s instructions and use a spotter. Once the trailer is in position, secure the wheels before disconnecting the tow vehicle.
Never unhitch a trailer on a slope without following the proper securing procedure.
Step 4. Correct the Side-to-Side Position
Side-to-side leveling corrects differences in height between the two sides of an RV.
For many travel trailers and fifth wheels using manual leveling equipment, the process involves:
- Identify which side of the RV is lower.
- Select a suitable leveling ramp or blocks with sufficient load capacity.
- Position the equipment beneath the appropriate tires according to its instructions.
- Move the RV onto the leveling equipment slowly, using a spotter when needed.
- Check the level again.
- Make small adjustments until the side-to-side reading is within the manufacturer’s recommended range.
For RVs with tandem axles, use leveling equipment designed for the tire and axle configuration. Follow the equipment manufacturer’s instructions about supporting the tires.
Do not stack random objects beneath the wheels or use damaged blocks. The support surface must remain stable under the vehicle’s weight.
Step 5. Adjust the Front-to-Back Position
After correcting the side-to-side position, check the front-to-back level.
The adjustment method depends on the RV type.
For a travel trailer, the tongue jack is generally used to raise or lower the front after the trailer wheels have been secured and the tow vehicle has been disconnected according to the manufacturer’s instructions.
For a fifth wheel, the front landing gear performs the corresponding adjustment.
Make gradual changes while watching the level. Avoid extending a jack beyond its rated travel or using it in a way the manufacturer does not permit.
If the front or rear remains significantly uneven after reasonable adjustments, reconsider the parking position rather than forcing the equipment to compensate for an excessive slope.
Step 6. Confirm That the RV Is Properly Supported
Once the adjustments are complete, check the RV again.
Confirm that:
- The side-to-side reading is correct.
- The front-to-back reading is correct.
- All leveling blocks remain properly positioned.
- The jacks have secure ground contact.
- The wheels remain supported as required by the manufacturer.
- No equipment has shifted or sunk into the ground.
Avoid using leveling equipment to lift the vehicle beyond its approved limits. An RV should not be left in an unstable position with tires suspended unless a specific manufacturer-approved procedure permits that configuration.
Step 7. Deploy Stabilizer Jacks After Leveling
Once the RV has been leveled, deploy the stabilizers according to the owner’s manual.
Stabilizers help reduce movement when people walk around inside the vehicle. They are not designed to perform the primary leveling operation or carry the entire weight of the RV.
This distinction is especially important for travel trailers and fifth wheels with manual stabilizer systems. Using stabilizers to raise an RV can damage the jacks or frame.
Keep the support feet properly positioned and use suitable pads where required.
Step 8. Perform a Final Setup Inspection
Before settling inside, walk around the RV and inspect the completed setup.
Check:
- The final level readings.
- Wheel chocks and leveling equipment.
- Stabilizer placement.
- Clearance around doors and compartments.
- Slide-out operation according to the manufacturer’s sequence.
- The position of electrical, water, and sewer connections.
If the vehicle becomes uneven after the slide-outs are extended, do not make improvised adjustments. Consult the manufacturer’s instructions to identify the correct setup procedure.
A final inspection helps identify problems before they become more difficult to correct.
How to Level Different Types of RVs
Not every recreational vehicle uses the same leveling equipment. Understanding these differences helps you avoid using the wrong method.
How to Level a Travel Trailer
Travel trailers commonly use leveling blocks or ramps for side-to-side adjustments and a tongue jack for front-to-back adjustments.
A typical setup involves:
- Positioning the trailer on a suitable parking surface.
- Correcting side-to-side height with appropriate leveling blocks.
- Securing the wheels with chocks.
- Disconnecting the towing vehicle according to the owner’s manual.
- Using the tongue jack for front-to-back adjustment.
- Deploying stabilizers after leveling is complete.
Always check the equipment instructions for your specific trailer.
How to Level a Fifth Wheel
Fifth wheels have front landing gear and may also have built-in electric or hydraulic leveling systems.
Manual side-to-side adjustment may involve blocks beneath the appropriate tires. Once the wheels are secured, the landing gear can be used to adjust the front-to-back position.
Some fifth wheels have automatic leveling systems that coordinate multiple jacks. Follow the specific operating sequence, including any instructions concerning slide-outs and ground support.
How to Level a Motorhome
Motorhomes may use hydraulic, electric, or automatic leveling systems.
Depending on the model, an automatic system may use several leveling jacks to adjust the vehicle. Owners should:
- Park on suitable, stable ground.
- Apply the parking brake as directed.
- Check the system’s operating requirements.
- Position approved jack pads where necessary.
- Follow the control panel’s instructions.
- Keep people clear of the jacks while the system operates.
Never use a motorhome leveling system to perform maintenance underneath the vehicle. Leveling jacks are not substitutes for properly rated service stands and workshop lifting equipment.
For all three RV types, consult the owner’s manual before operating leveling equipment.
Tips for Leveling an RV on Different Ground Surfaces
The ground beneath an RV affects how well leveling equipment performs. Some surfaces provide consistent support, while others can shift or compress under the vehicle’s weight.
| Ground surface | Practical considerations |
| Gravel | Check that the gravel is compacted and that blocks or pads sit securely. |
| Grass | Look for soft or wet areas that may compress under the tires or jacks. |
| Concrete | Check the direction and amount of slope, along with jack placement. |
| Dirt | Watch for loose soil, depressions, and uneven support points. |
| Soft or muddy ground | Avoid parking if the surface cannot reliably support the vehicle. |
Leveling an RV on Gravel
Gravel surfaces can provide suitable support when the material is compacted and stable. However, loose gravel may shift under tires or leveling equipment.
Choose a firm section of the campsite and position blocks or pads on a stable area. Check their position again after completing the setup.
Leveling an RV on Grass
Grass-covered areas can sometimes hide soft soil, holes, or uneven ground.
Before parking, check for wet or recently disturbed ground. Avoid placing heavy leveling equipment on an area that may compress or allow the jack to sink.
Also check the campground’s parking rules. Some properties restrict parking on grass even when the surface appears suitable.
Leveling an RV on a Sloped Concrete Pad
Concrete pads usually provide a firm support surface, but they are not always perfectly level.
Measure the slope before making adjustments. If the height difference exceeds the available range of your leveling equipment, request another site rather than attempting an excessive lift.
Leveling an RV on Soft Soil
Soft soil is particularly challenging because the ground can compress under the weight of the RV.
Suitable load-distribution pads may help when the soil is otherwise stable and the equipment manufacturer permits their use. However, pads cannot make severely unstable ground safe.
When the ground shifts, sinks, or becomes saturated, moving the RV is often the better decision.
Common RV Leveling Mistakes You Should Avoid
Even with the right tools, incorrect leveling techniques can create unnecessary problems. Understanding common mistakes helps you protect your RV and avoid repeating the same setup issues.
Using Stabilizer Jacks to Level the RV
One of the most common mistakes is treating stabilizer jacks as leveling equipment.
Stabilizers are designed to reduce movement after the vehicle has been leveled. They are not intended to lift the RV or support its entire weight.
Using them incorrectly can damage the jacks, mounting points, or vehicle frame.
Forgetting to Secure the Wheels
An RV parked on a slope can move unexpectedly if its wheels are not secured properly.
Use suitable wheel chocks according to the manufacturer’s instructions. Never rely on leveling blocks alone to prevent movement.
Using Damaged or Improper Leveling Blocks
Damaged, undersized, or unsuitable blocks can shift under pressure.
Always choose leveling equipment with an appropriate load rating and make sure it is designed for your tire configuration. Avoid improvised stacks of unstable materials.
Extending Jacks Beyond Their Recommended Limits
Trying to correct a steep slope by extending jacks too far can compromise stability and damage equipment.
Every leveling system has operating limitations. When the adjustment range is insufficient, reposition the RV or choose another campsite.
Leaving Wheels Unsupported
An RV should not be positioned with tires unintentionally suspended above the ground. Doing so can place additional stress on suspension components and create an unstable setup.
Use appropriate leveling blocks and follow the manufacturer’s instructions for maintaining wheel contact.
Extending Slide-Outs Without Following Leveling Instructions
Some RV owners extend slide-outs before checking the vehicle’s level. Depending on the design, this can affect slide-out alignment and operation.
Check your owner’s manual for the required sequence. Do not assume that every RV uses the same procedure.
Ignoring Changes in Ground Conditions
A campsite can appear firm when you first arrive, but soft soil may compress under the weight of the RV.
Check the ground beneath your leveling blocks and jacks after setup. If the equipment begins sinking or shifting, address the problem before continuing to occupy the vehicle.
How to Troubleshoot Common RV Leveling Problems
Sometimes an RV does not remain level even after the initial setup. This can happen because of shifting ground, equipment problems, or incorrect positioning.
The following examples can help you identify what to investigate.
| Common problem | Possible cause | Recommended action |
| RV still feels tilted | Incorrect initial measurements | Recheck both leveling directions |
| Blocks keep shifting | Poor positioning or unstable ground | Reposition using suitable equipment |
| Jacks sink into the ground | Soft or compressed soil | Reassess the site and use approved support pads |
| Automatic leveling system displays an error | System fault or operating condition outside its limits | Consult the manufacturer’s troubleshooting instructions |
| RV becomes uneven overnight | Ground compression or equipment movement | Inspect the support points and reassess stability |
| Slide-outs operate unevenly | Incorrect leveling or setup sequence | Follow the slide-out manufacturer’s instructions |
What to Do When the RV Becomes Uneven Overnight
Ground conditions can change after an RV has been parked for several hours. Rain, moisture, or soft soil may cause leveling blocks and jack pads to settle.
If you notice a change:
- Check whether the vehicle or support equipment has shifted.
- Inspect the ground beneath the tires and jacks.
- Check the level again using a reliable measuring tool.
- Follow the manufacturer’s procedure before making any adjustments.
Do not crawl underneath the RV to inspect or adjust equipment while it is supported only by leveling jacks.
What If an Automatic Leveling System Stops Working?
An automatic leveling system may stop operating because of an error code, low battery voltage, a control issue, or a condition outside its permitted operating range.
Check the display for error information and consult the relevant system manual. Do not repeatedly force the system to operate or attempt repairs to hydraulic or electrical components without the required knowledge.
Contact a qualified RV technician when the cause is unclear or the equipment appears damaged.
When Should You Choose Another Campsite Instead of Leveling?
Not every campsite can be corrected with leveling blocks or jacks. Sometimes moving to another parking area is the safest option.
Consider choosing another site when:
- The slope exceeds the adjustment range of your RV’s leveling system.
- The ground is too soft to support the vehicle.
- Deep ruts or depressions make the parking area unstable.
- Leveling blocks cannot be positioned securely.
- The jacks cannot reach the ground within their approved operating limits.
- The RV would need to be lifted in an unsupported or unsafe configuration.
- There is insufficient clearance for slide-outs or other equipment.
Trying to correct an unsuitable campsite can place unnecessary stress on the RV and its leveling equipment.
At Porter Strong RV Resort, guests should also follow the assigned-site requirements and parking restrictions. The resort’s rules and regulations prohibit parking on grass or adjacent vacant sites. Always use your designated RV space rather than positioning your vehicle on an unapproved area.
Final RV Leveling Checklist Before Settling In
Once leveling is complete, use this checklist to confirm that everything is properly positioned.
- The RV is parked on suitable, stable ground.
- Side-to-side level has been checked.
- Front-to-back level has been checked.
- Appropriate leveling blocks or ramps are securely positioned.
- Wheel chocks are properly installed.
- Jacks and landing gear are within their operating limits.
- Ground support pads are correctly positioned where required.
- Stabilizers are deployed according to the owner’s manual.
- Slide-outs are operated according to manufacturer instructions.
- A final stability inspection has been completed.
Keeping a checklist in your RV makes campsite setup more organized, especially when arriving at unfamiliar locations.
Frequently Asked Questions
You can use manual leveling blocks or ramps, a bubble level, wheel chocks, and the appropriate jacks. First, identify which direction needs adjustment. Correct the side-to-side position using suitable blocks or ramps, secure the wheels, and then adjust the front-to-back position using the equipment approved for your RV.
For many conventional travel trailers and fifth wheels, side-to-side leveling is completed first using blocks or ramps beneath the wheels. After securing the vehicle, front-to-back adjustments are made using the tongue jack or landing gear. Motorhomes with automatic systems may follow a different sequence.
Leveling blocks can help correct differences in tire height, particularly when adjusting the side-to-side position of towable RVs. However, they may not be sufficient for every adjustment. You might also need a tongue jack, landing gear, or an approved built-in leveling system.
The number depends on the RV’s weight, axle configuration, tire arrangement, campsite slope, and block design. Some RVs require several interlocking blocks, while others use graduated ramps. Always follow the equipment manufacturer’s load capacity and placement instructions.
No. Standard stabilizer jacks are designed to reduce movement after an RV has been leveled. They are not intended to lift the vehicle or support its full weight. Use equipment specifically designed and approved for leveling.
It can be safe when the surface is firm, stable, and capable of supporting the RV’s weight. Check for loose gravel, wet soil, or soft areas that may shift under the tires or jacks. Use approved support pads when necessary and avoid unstable ground.
Tires should remain properly supported according to the RV manufacturer’s instructions. Unintentionally lifting wheels off the ground can create instability and place additional stress on vehicle components. Do not suspend tires unless a specific manufacturer-approved procedure permits it.
Many RV manufacturers require the vehicle to be leveled before extending slide-outs, but the exact sequence varies by model. Check the owner’s manual and slide-out system instructions before operating them.
An improperly positioned RV can create discomfort and may affect certain appliances, slide-outs, doors, and plumbing systems. Prolonged pressure on incorrectly positioned supports may also contribute to equipment stress. Follow the manufacturer’s leveling requirements whenever the RV is parked.
10. When should you move your RV to another campsite instead of trying to level it?
Move to another site when the slope exceeds the equipment’s operating range, the ground cannot support the vehicle, or leveling blocks and jacks cannot be positioned securely. Choosing a more suitable parking area is safer than forcing an unstable setup.
Conclusion
Learning how to level an RV on uneven ground makes campsite setup easier and helps prevent problems caused by improper positioning. The process starts with choosing a stable parking area, checking the vehicle’s level, and selecting appropriate equipment. From there, careful adjustments to the tires, leveling jacks, or built-in system help create a balanced setup.
Remember that leveling and stabilization serve different purposes. Use the correct equipment, follow the manufacturer’s operating instructions, and avoid forcing your RV into an unsuitable parking position. With proper preparation and a consistent setup routine, you can create a more comfortable and stable environment wherever your RV travels.